Selling on the till
Scan, search or tap products, sell by weight, choose options and change quantities.
- For cashiers
On this page
What it's for
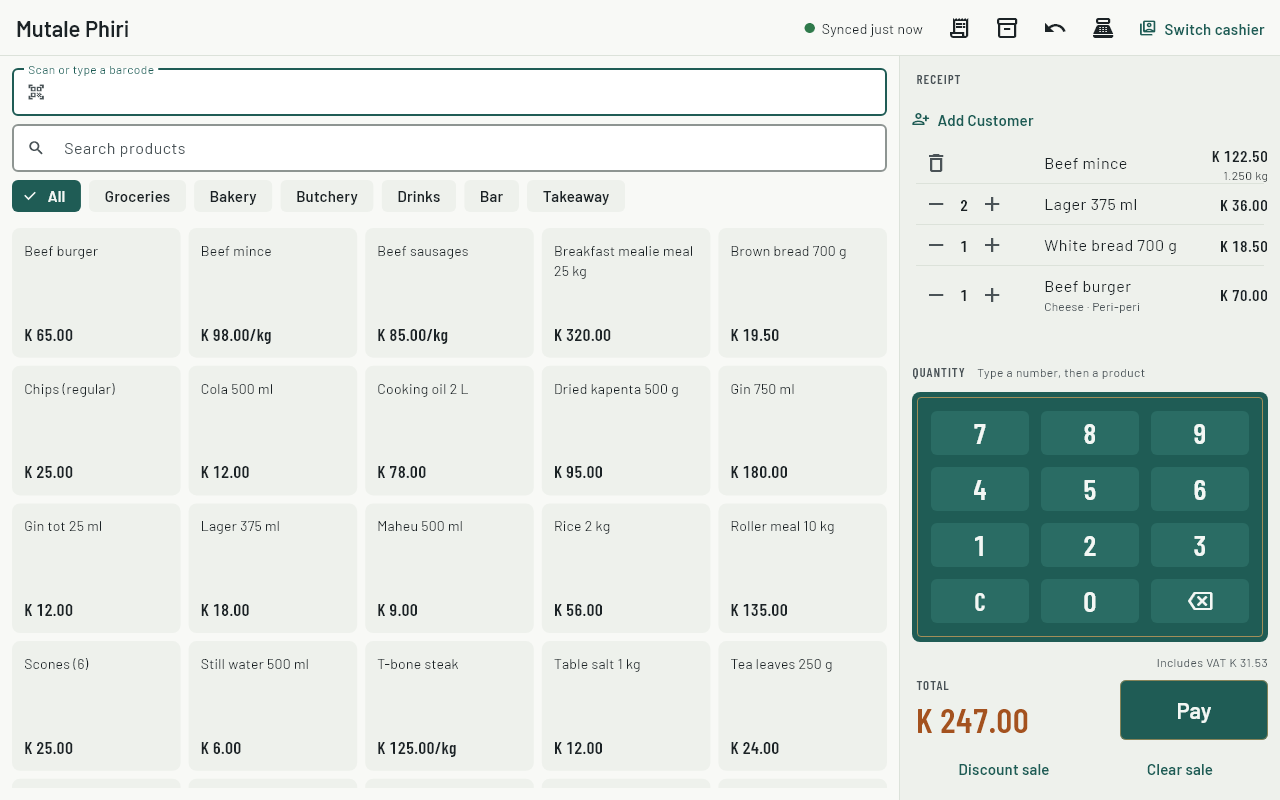
The sell screen builds the customer's sale. The total and the VAT update as you add items, and Pay takes you to payment.
Before you start
Log in with your PIN. Your name shows at the top of the screen.
Steps
Add items
- Scan the barcode with the scanner. The scan box is always ready; you don't need to tap it first.
- Or type the barcode in the scan box and press Enter.
- Or search by name in the search box, then tap the product.
- Or tap a category at the top to narrow the list.
Scanning the same item again adds one more.
Add several at once
Under the receipt is the keypad. Type a number on it, for example 6, then tap or scan the product: six are added in one go. The number shows next to Quantity until you add the item; tap C to cancel it. Weighed items ignore it and ask for the weight as usual.
Weighed items
- With a scale label: scan the label printed by the scale. The weight or price on the label is added for you.
- Without a label: tap the item (or scan its barcode), type the weight in kg, for example
1.250, and tap Add.
Options
Items with options, such as a burger's size, show a list of choices. Pick them, then tap Add. Choices marked required must be picked.
Quantities and notes
- Tap + or − next to an item to change how many. Going below one removes it.
- Tap the bin to remove a weighed item.
- Press and hold an item to add a note, such as "no ice", or a discount. See Discounts and removing items.
- Clear sale empties the whole sale.
Removed items and cleared sales are recorded in the owner's activity log.
Refunds
To give money back, tap the refund icon (the arrow) at the top. See Refunds.
Camera scanning (Android)
Tap the camera button next to the scan box and point the camera at the barcode.
Switching cashier
Tap Switch cashier at the top. The next person logs in with their own PIN.
On a phone the top bar is shorter: Switch cashier is the person icon, the sync status is just its coloured dot, and History, Stock, Refund, Close shift and Receipt printer are in the ⋮ menu.
Sales history and reprinting
Tap the receipt icon at the top to open History. Cashiers see their own sales; owners and managers see every sale on this till, newest first.
- A cloud icon means the sale has reached the server. A clock means it is waiting on the till and will send when the internet is back.
- Tap a sale to see its items and payments, then tap Reprint for a copy of the receipt. A reprint never opens the cash drawer.
Adding the customer
When the buyer needs their details on the receipt and invoice, tap Add Customer above the cart. Search by name, phone or TPIN and tap them, or choose New Customer to add them. Their name then shows above the cart; tap the cross to remove them. If your business requires a customer on every sale, the till asks for one when you tap Pay. See Customers.
Checking stock
Tap the box icon at the top to open Stock. Type a product name, or scan its barcode into the search box. The level includes sales made on this till that haven't synced yet. Products sold in packs show both, for example 4.2 packs (3,150 ml). Sales on other tills appear after this till next syncs.
Common questions
It says "Product not found".
The barcode isn't in the product list, or the scale label didn't read properly. Try scanning again, or search by name. Ask your manager to add missing products on the dashboard.
The price is wrong.
Prices come from the dashboard. Ask your manager to correct it. The till gets the new price the next time it's online.
The stock level looks wrong.
The level is from the last sync, less this till's own unsynced sales. Sales on other tills and deliveries recorded on the dashboard appear after the next sync.
Can I sell without internet?
Yes. See Selling offline and syncing.